从多年前自建ss,然后docker装ss,再转v2ray,一路翻山涉水,虽有辛劳,并无险阻。眼看归国之日渐近,这两日重搭梯子,却没少折腾。懒得看长文参数和原理,网上搜个攻略开干均告失败,是自己老家户不灵了,还是道行升高?反正是两不搭了🤣。
反复查linux命令权限和troubleshooting,反复试错后终于成功,与俺的WP主机一同运行,CPU占用率基本没啥变化,维持在5-6%。实施步骤如下。
攻略:https://guide.v2fly.org/prep/install.html#安装前的准备
先赋予root权限
usr@WP_server:~$ sudo su
安装 curl
root@server:/home/usr# apt install curl
下载安装脚本
root@server:/home/usr# sudo curl -O https://raw.githubusercontent.com/v2fly/fhs-install-v2ray/master/install-release.sh
执行脚本安装V2ray及其输出结果
root@server:/home/usr# sudo bash install-release.sh
info: Installing V2Ray v4.39.2 for x86_64
Downloading V2Ray archive: https://github.com/v2fly/v2ray-core/releases/download/v4.39.2/v2ray-linux-64.zip
% Total % Received % Xferd Average Speed Time Time Time Current
Dload Upload Total Spent Left Speed
100 626 100 626 0 0 2484 0 --:--:-- --:--:-- --:--:-- 2474
100 12.3M 100 12.3M 0 0 12.0M 0 0:00:01 0:00:01 --:--:-- 12.0M
Downloading verification file for V2Ray archive: https://github.com/v2fly/v2ray-core/releases/download/v4.39.2/v2ray-linux-64.zip.dgst
info: Extract the V2Ray package to /tmp/tmp.L2IP5rOk7z and prepare it for installation.
rm: cannot remove '/etc/systemd/system/v2ray.service.d/10-donot_touch_multi_conf.conf': No such file or directory
rm: cannot remove '/etc/systemd/system/v2ray@.service.d/10-donot_touch_multi_conf.conf': No such file or directory
info: Systemd service files have been installed successfully!
warning: The following are the actual parameters for the v2ray service startup.
warning: Please make sure the configuration file path is correctly set.
[Unit]Description=V2Ray Service
Documentation=https://www.v2fly.org/
After=network.target nss-lookup.target[Service]User=nobody
CapabilityBoundingSet=CAP_NET_ADMIN CAP_NET_BIND_SERVICE
AmbientCapabilities=CAP_NET_ADMIN CAP_NET_BIND_SERVICE
NoNewPrivileges=true
ExecStart=/usr/local/bin/v2ray -config /usr/local/etc/v2ray/config.json
Restart=on-failure
RestartPreventExitStatus=23[Install]WantedBy=multi-user.target
# In case you have a good reason to do so, duplicate this file in the same directory and make your customizes there.
# Or all changes you made will be lost! # Refer: https://www.freedesktop.org/software/systemd/man/systemd.unit.html
[Service]ExecStart=
ExecStart=/usr/local/bin/v2ray -config /usr/local/etc/v2ray/config.json
warning: The systemd version on the current operating system is too low.
warning: Please consider to upgrade the systemd or the operating system.
installed: /usr/local/bin/v2ray
installed: /usr/local/bin/v2ctl
installed: /usr/local/share/v2ray/geoip.dat
installed: /usr/local/share/v2ray/geosite.dat
installed: /usr/local/etc/v2ray/config.json
installed: /var/log/v2ray/
installed: /var/log/v2ray/access.log
installed: /var/log/v2ray/error.log
installed: /etc/systemd/system/v2ray.service
installed: /etc/systemd/system/v2ray@.service
removed: /tmp/tmp.L2IP5rOk7z
info: V2Ray v4.39.2 is installed.
You may need to execute a command to remove dependent software: apt purge curl unzip
Please execute the command: systemctl enable v2ray; systemctl start v2ray
错误warning一堆蛮吓人的哈,不管继续搞,设置config.json,enable,start,status一气呵成
root@server:/home/usr# sudo nano /usr/local/etc/v2ray/config.json
root@server:/home/usr# systemctl enable v2ray
Created symlink /etc/systemd/system/multi-user.target.wants/v2ray.service → /etc/systemd/system/v2ray.service.
root@server:/home/usr# systemctl start v2ray
root@server:/home/usr# systemctl status v2ray
输出如下,大功告成
● v2ray.service - V2Ray Service
Loaded: loaded (/etc/systemd/system/v2ray.service; enabled; vendor preset: enabled)
Drop-In: /etc/systemd/system/v2ray.service.d
└─10-donot_touch_single_conf.conf
Active: active (running) since Fri 2021-06-18 17:58:27 CST; 8s ago
Docs: https://www.v2fly.org/
Main PID: 1531 (v2ray)
Tasks: 5 (limit: 1106)
CGroup: /system.slice/v2ray.service
└─1531 /usr/local/bin/v2ray -config /usr/local/etc/v2ray/config.json
Jun 18 17:58:27 server systemd[1]: Started V2Ray Service.
Jun 18 17:58:27 server v2ray[1531]: V2Ray 4.39.2 (V2Fly, a community-driven edition of V2Ray.) Custom (go1.16.4
Jun 18 17:58:27 server v2ray[1531]: A unified platform for anti-censorship.
Jun 18 17:58:27 server v2ray[1531]: 2021/06/18 09:58:27 [Info] main/jsonem: Reading config: /usr/local/etc/v2ra
[1]+ Stopped systemctl status v2ray
最后送一个UUID生成器,用户ID就是一个UUID:https://1024tools.com/uuid?
最后是俺抄的config.json,最直白简单的TCP方式
{
  "log": {
  "loglevel": "warning",
  "access": "/var/log/v2ray/access.log", // 这是 Linux 的路径
  "error": "/var/log/v2ray/error.log"
 },
  "inbounds": [{
    "port": xxxx,           //!!! 此处为安装时生成的端口,可修改随意,但是保证和下面提到的端口号相同
    //"listen":"127.0.0.1",  // !!! uncomment for nginx local forwarding
    "protocol": "vmess",
    "settings": {
      "clients": [
        {
          "id": "a0100cc1-b1f1-4899-9483-4aa73276343e", //!!! 修改为任一合法UUID
          "level": 1,
          "alterId": 64      //此处为安装时生成的 alterId
        }
      ]
    },
    "streamSettings": {
	    "network": "tcp"
    }
  }],
  "outbounds": [{
    "protocol": "freedom",
    "settings": {}
  },{
    "protocol": "blackhole",
    "settings": {},
    "tag": "blocked"
  }],
  "routing": {
    "rules": [
      {
        "type": "field",
        "ip": ["geoip:private"],
        "outboundTag": "blocked"
      }
    ]
  }
}后附安装手册全文,以备不时:https://guide.v2fly.org/prep/install.html#客户端安装
安装
本节将说明如何安装 V2Ray,内容包含服务器安装和客户端安装。需要注意的是,与 Shadowsocks 不同,从软件上 V2Ray 不区分服务器版和客户端版,也就是说在服务器和客户端运行的 V2Ray 是同一个软件,区别只是配置文件的不同。因此 V2Ray 的安装在服务器和客户端上是一样的,但是通常情况下 VPS 使用的是 Linux 而 PC 使用的是 Windows,因此本章默认服务器为 Linux VPS,客户端为 Windows PC。如果你的 PC 使用的是 Linux 操作系统,那么请参考本文的服务器安装;VPS 使用的是 Windows,参考本文的客户端安装;如果你使用的是 MacOS ,请你自行研究怎么安装吧,安装完了跳过本节继续往下看。
#安装前的准备
#时间校准
对于 V2Ray,它的验证方式包含时间,就算是配置没有任何问题,如果时间不正确,也无法连接 V2Ray 服务器的,服务器会认为你这是不合法的请求。所以系统时间一定要正确,只要保证时间误差在90 秒之内就没问题。
对于 VPS(Linux) 可以执行命令 date -R 查看时间:
$ date -R
Sun, 22 Jan 2017 10:10:36 -0500
输出结果中的 -0500 代表的是时区为西 5 区,如果转换成东 8 区时间则为 2017-01-22 23:10:36。
如果时间不准确,可以使用 date --set 修改时间:
$ sudo date --set="2017-01-22 16:16:23"
Sun 22 Jan 16:16:23 GMT 2017
如果你的服务器架构是 OpenVZ,那么使用上面的命令有可能修改不了时间,直接发工单联系 VPS 提供商的客服吧,就说你在 VPS 上运行的服务对时间有要求,要他们提供可行的修改系统时间的方法。
对 VPS 的时间校准之后接着是个人电脑,如何修改电脑上的时间我想不必我多说了。
无论是 VPS 还是个人电脑,时区是什么无所谓,因为 V2Ray 会自动转换时区,但是时间一定要准确。
#使用 root 账户
为了方便后续脚本的执行安装,在此,我们切换成 root 账户。
执行命令:su 之后输入管理员密码(此处的密码是默认隐藏的,不要以为没打上去)。
执行以后命令行形如:
user@host:~$ su
Password:
root@host:/home/user#
#服务器安装
在 Linux 操作系统, V2Ray 的安装有脚本安装、手动安装、编译安装 3 种方式,选择其中一种即可,本指南仅提供使用使用脚本安装的方法,并仅推荐使用脚本安装,该脚本由 V2Ray 官方提供。该脚本仅可以在 Debian 系列或者支持 Systemd 的 Linux 操作系统使用。
除非你是大佬,或者能够自行处理类似 command not found 的问题,否则请你使用 Debian 8.x 以上或者 Ubuntu 16.04 以上的 Linux 系统。 本指南默认使用 Debian 10 系统作为示范。
#安装依赖软件
首先安装脚本的依赖软件,根据你的 Linux 发行版选择以下命令。
注意:下文中需要你输入的命令均以 $ 开头,其他内容均来自系统执行命令的反馈,你可以通过比较自己屏幕上和文档中内容的异同来判断安装是否正确。
Debian/Ubuntu:
$ apt update
$ apt install curl
CentOS/RedHat :
$ yum makecache
$ yum install curl
Fedora:
$ dnf makecache
$ dnf install curl
openSUSE/SUSE:
$ zypper refresh
$ zypper install curl
#下载安装脚本
下载主程序安装脚本:
$ curl -O https://raw.githubusercontent.com/v2fly/fhs-install-v2ray/master/install-release.sh
  % Total    % Received % Xferd  Average Speed   Time    Time     Time  Current
                                 Dload  Upload   Total   Spent    Left  Speed
  0     0    0     0    0     0      0      0 --:--:-- --:--:-- --:--:--     0
  0     0    0     0    0     0      0      0 --:--:--  0:00:01 --:--:--     0
100 21613  100 21613    0     0   8732      0  0:00:02  0:00:02 --:--:--  8736
#执行安装
安装 V2ray 主程序:
$ bash install-release.sh
Downloading V2Ray archive: https://github.com/v2fly/v2ray-core/releases/download/v4.27.0/v2ray-linux-64.zip
  % Total    % Received % Xferd  Average Speed   Time    Time     Time  Current
                                 Dload  Upload   Total   Spent    Left  Speed
  0     0    0     0    0     0      0      0 --:--:-- --:--:-- --:--:--     0
  0     0    0     0    0     0      0      0 --:--:-- --:--:-- --:--:--     0
100   631  100   631    0     0    331      0  0:00:01  0:00:01 --:--:--   331
  0     0    0     0    0     0      0      0 --:--:--  0:00:02 --:--:--     0
100 12.2M  100 12.2M    0     0   841k      0  0:00:14  0:00:14 --:--:-- 1899k
Downloading verification file for V2Ray archive: https://github.com/v2fly/v2ray-core/releases/download/v4.27.0/v2ray-linux-64.zip.dgst
  % Total    % Received % Xferd  Average Speed   Time    Time     Time  Current
                                 Dload  Upload   Total   Spent    Left  Speed
  0     0    0     0    0     0      0      0 --:--:-- --:--:-- --:--:--     0
  0     0    0     0    0     0      0      0 --:--:-- --:--:-- --:--:--     0
100   636  100   636    0     0    294      0  0:00:02  0:00:02 --:--:--   295
  0     0    0     0    0     0      0      0 --:--:--  0:00:02 --:--:--     0
100   590  100   590    0     0    133      0  0:00:04  0:00:04 --:--:--   282
Reading package lists... Done
Building dependency tree
Reading state information... Done
Suggested packages:
  zip
The following NEW packages will be installed:
  unzip
0 upgraded, 1 newly installed, 0 to remove and 0 not upgraded.
Need to get 172 kB of archives.
After this operation, 580 kB of additional disk space will be used.
Get:1 http://mirrors.163.com/debian buster/main amd64 unzip amd64 6.0-23+deb10u1 [172 kB]
Fetched 172 kB in 1s (173 kB/s)
Selecting previously unselected package unzip.
(Reading database ... 31383 files and directories currently installed.)
Preparing to unpack .../unzip_6.0-23+deb10u1_amd64.deb ...
Unpacking unzip (6.0-23+deb10u1) ...
Setting up unzip (6.0-23+deb10u1) ...
Processing triggers for mime-support (3.62) ...
Processing triggers for man-db (2.8.5-2) ...
info: unzip is installed.
info: Extract the V2Ray package to /tmp/tmp.vk9AF2EqKA/ and prepare it for installation.
installed: /usr/local/bin/v2ray
installed: /usr/local/bin/v2ctl
installed: /usr/local/share/v2ray/geoip.dat
installed: /usr/local/share/v2ray/geosite.dat
installed: /usr/local/etc/v2ray/00_log.json
installed: /usr/local/etc/v2ray/01_api.json
installed: /usr/local/etc/v2ray/02_dns.json
installed: /usr/local/etc/v2ray/03_routing.json
installed: /usr/local/etc/v2ray/04_policy.json
installed: /usr/local/etc/v2ray/05_inbounds.json
installed: /usr/local/etc/v2ray/06_outbounds.json
installed: /usr/local/etc/v2ray/07_transport.json
installed: /usr/local/etc/v2ray/08_stats.json
installed: /usr/local/etc/v2ray/09_reverse.json
installed: /var/log/v2ray/
installed: /var/log/v2ray/access.log
installed: /var/log/v2ray/error.log
installed: /etc/systemd/system/v2ray.service
installed: /etc/systemd/system/v2ray@.service
removed: /tmp/tmp.vk9AF2EqKA/
info: V2Ray v4.27.0 is installed.
You may need to execute a command to remove dependent software: apt remove curl unzip
Please execute the command: systemctl enable v2ray; systemctl start v2ray
看到类似于这样的提示就算安装成功了。如果安装不成功脚本会有提示语句,这个时候你应当按照提示除错,除错后再重新执行一遍脚本安装 V2Ray。对于错误提示如果看不懂,使用翻译软件翻译一下就好。
#运行
安装完之后,使用以下命令启动 V2Ray:
$ systemctl start v2ray
在首次安装完成之后,V2Ray 不会自动启动,需要手动运行上述启动命令。
设置开机自启动 V2Ray:
$ systemctl enable v2ray
接下来看看 V2ray 是不是真的运行起来了:
$ systemctl status v2ray
● v2ray.service - V2Ray Service
   Loaded: loaded (/etc/systemd/system/v2ray.service; disabled; vendor preset: enabled)
   Active: active (running) since Sun 2020-08-16 23:17:13 CST; 41min ago
 Main PID: 1984 (v2ray)
    Tasks: 6 (limit: 2359)
   Memory: 6.9M
   CGroup: /system.slice/v2ray.service
           └─1984 /usr/local/bin/v2ray -confdir /usr/local/etc/v2ray/

Aug 16 23:17:13 debian v2ray[1984]: v2ctl> Read config:  /usr/local/etc/v2ray/01_api.json
Aug 16 23:17:13 debian v2ray[1984]: v2ctl> Read config:  /usr/local/etc/v2ray/02_dns.json
Aug 16 23:17:13 debian v2ray[1984]: v2ctl> Read config:  /usr/local/etc/v2ray/03_routing.json
Aug 16 23:17:13 debian v2ray[1984]: v2ctl> Read config:  /usr/local/etc/v2ray/04_policy.json
Aug 16 23:17:13 debian v2ray[1984]: v2ctl> Read config:  /usr/local/etc/v2ray/05_inbounds.json
Aug 16 23:17:13 debian v2ray[1984]: v2ctl> Read config:  /usr/local/etc/v2ray/06_outbounds.json
Aug 16 23:17:13 debian v2ray[1984]: v2ctl> Read config:  /usr/local/etc/v2ray/07_transport.json
Aug 16 23:17:13 debian v2ray[1984]: v2ctl> Read config:  /usr/local/etc/v2ray/08_stats.json
Aug 16 23:17:13 debian v2ray[1984]: v2ctl> Read config:  /usr/local/etc/v2ray/09_reverse.json
Aug 16 23:17:13 debian v2ray[1984]: 2020/08/16 23:17:13 [Warning] v2ray.com/core: V2Ray 4.27.0 start
lines 1-19/19 (END)
看到类似于这样的提示就算启动成功了。
但是由于此时你还没有为 V2ray 配置,所以咱们还是把它关掉吧:
$ systemctl stop v2ray
对于安装脚本,还有更多用法,在此不多说了,可以执行 bash install-release.sh -h 看帮助。
关于 V2ray 配置,请参考 v2ray-examples (opens new window)内的示例。
#升级更新
在 VPS,重新执行一遍安装脚本就可以更新了,在更新过程中会自动重启 V2Ray,配置文件保持不变。
$ bash install-release.sh
V2Ray 的更新策略是快速迭代,每周更新(无意外的情况下)。版本号的格式是 vX.Y.Z,如 v2.44.0。v 是固定的字母 v,version 的首字母;X、Y、Z 都是数字,X 是大版本号,每年更新一个大版本(现在是 v4.Y.Z,V2Ray 已经走到了第四个年头),Y 是小版本,每周五更新一个小版本。Z 是区分正式版和测试版,Z 是 0 代表着是正式版,不是 0 说明是测试版。例如,v4.7.0 是正式版,v4.7.1 是测试版,建议只使用正式版,不手动指定的情况下 V2Ray 的安装脚本也只会安装最新的正式版。
有些细心的朋友可能会注意到有时候周五 V2Ray 刚发布了一个新版本,次日或过两日又更新一个正式版。出现这种情况是因为周五发布的正式版出现了影响使用严重的 BUG,需要立马发布一个新版本。这种情况比较烦,但是为了保证兼容性、性能优化等又需要保证版本不要太老旧。所以我比较建议在周四更新,选这么一个日子是因为有重大的 BUG 肯定在前面几天就已经修复了,小问题(恐怕都不知道有)的话不会影响使用;而且版本号与最新版相比迟那么一两个也没什么关系。
#客户端安装
点这里 (opens new window)下载 V2Ray 的 Windows 压缩包,如果是 32 位系统,下载 v2ray-windows-32.zip,如果是 64 位系统,下载 v2ray-windows-64.zip(下载速度慢或无法下载请考虑挂已有的翻墙软件来下载)。下载并且解压之后会有下面这些文件:
v2ray.exe运行 V2Ray 的程序文件wv2ray.exe同 v2ray.exe,区别在于 wv2ray.exe 是后台运行的,不像 v2ray.exe 会有类似于 cmd 控制台的窗口。运行 V2Ray 时从 v2ray.exe 和 wv2ray.exe 中任选一个即可config.jsonV2Ray 的配置文件,后面我们对 V2Ray 进行配置其实就是修改这个文件v2ctl.exeV2Ray 的工具,有多种功能,除特殊用途外,一般由 v2ray.exe 来调用,用户不用太关心geosite.dat用于路由的域名文件geoip.dat用于路由的 IP 文件其它除上面的提到文件外,其他的不是运行 V2Ray 的必要文件。更详细的说明可以看 doc 文件夹下的 readme.md 文件,可以通过记事本或其它的文本编辑器打开查看
实际上双击 v2ray.exe (或 wv2ray.exe) 就可以运行 V2Ray 了,V2Ray 会读取 config.json 中的配置与服务器连接。默认的配置文件包含 V2Ray 官方服务器的配置,也就是说你可以不自己搭建服务器而直接使用 V2Ray 提供的服务器科学上网。在不修改 config.json 的情况下,双击运行 v2ray.exe,可以直接科学上网(V2Ray 官方服务器已下线)。

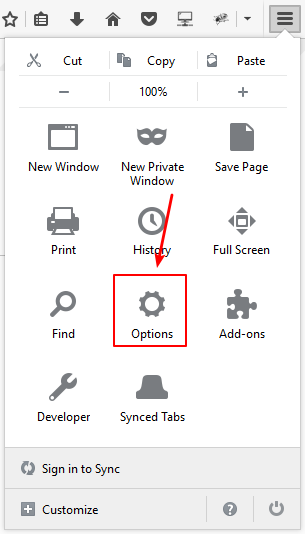
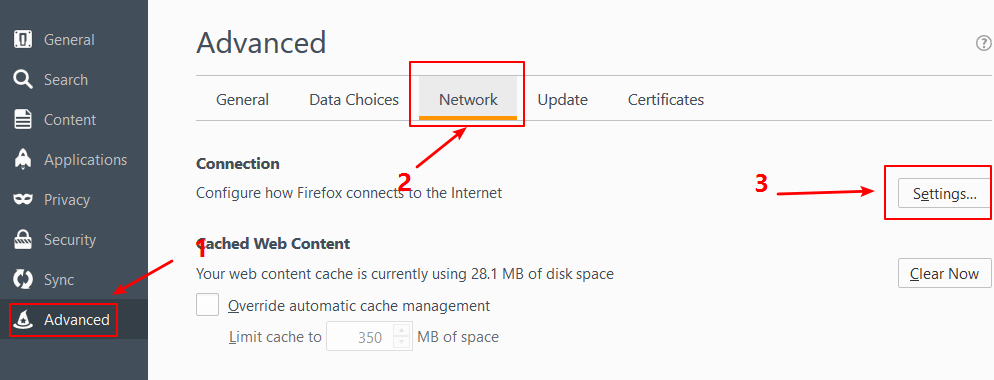
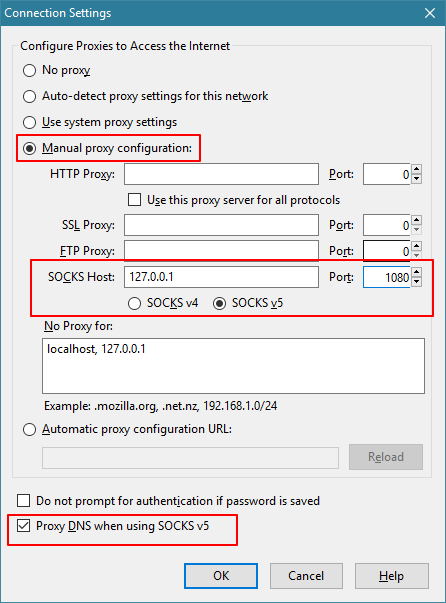
V2Ray 将所有选择权交给用户,它不会自动设置系统代理,因此还需要在浏览器里设置代理。以火狐(Firefox)为例,点菜单 -> 选项 -> 高级 -> 设置 -> 手动代理设置,在 SOCKS Host 填上 127.0.0.1,后面的 Port 填 1080,再勾上使用 SOCKS v5 时代理 DNS (这个勾选项在旧的版本里叫做远程 DNS)。
需要注意的是,有些客户端的 SOCKS Port 并不是 1080,实际 Port 需要查看客户端相关默认设置。
操作图见下:


如果使用的是其它的浏览器,请自行在网上搜一下怎么设置 SOCKS 代理。
![]() This work is licensed under a Creative Commons Attribution-NonCommercial-ShareAlike 4.0 International License.
This work is licensed under a Creative Commons Attribution-NonCommercial-ShareAlike 4.0 International License.
